In this example, we will demonstrate how to use HashiCorp Vault open-source solution to manage and use secrets.
Vault is an excellent piece of software for storing, accessing and sharing secrets between humans and services. Vault uses client - server architecture and provides HTTP API as well as command-line interface for secrets management, however, how to manage user access to those secrets is an open question which doesn’t have a straightforward answer.
When enabled, multiple authentication methods enable users and applications authenticate to Vault, including GitHub, LDAP, RADIUS authentication methods, among many others. Some of the methods, like LDAP, can be leveraged also for authorization. By defining relationships between LDAP and Vault groups in advance, Vault can map access policies based on the information provided from LDAP.
However, all of the authentication methods requires Vault to be configured in advance. Static policies must be mapped to authenticated entities, so if you expect some kind of self-service, where user can create their own safe space, you are on your own.
Case study - Hashicorp Vault
You can use Vault with:
- A command-line interface (CLI) by using Vault binary
- Ansible roles - save-secrets / load-secrets, that read secret to a variable
- calling HTTP API directly by using
curlcommand or libraries like Pythonrequests
Using Vault command-line interface (CLI)
To manage your secrets manually, you can use command-line interface of the Vault software itself:
- download Vault binary
- Setup environment variables:
  + `export VAULT_ADDR=https://vault.example.com`
  + `export VAULT_TOKEN=<your token>`
- Use CLI commands:
# list all entries under "secret/someproject" path
vault list secret/someproject

# read entry "mysecret" from "secret/someproject"
vault kv get secret/someproject/mysecret

# read "secret" field from "mysecret" secret located in "secret/someproject" path
vault kv get -field=secret secret/someproject/mysecret

# delete "mysecret" secret
vault delete secret/someproject/mysecret

# create new entry "yeatanotherpassword" with the "password=quert123" key/value pair
vault kv put secret/someproject/yetanotherpassword password=quert123
You can find basic CLI usage guide also on a vendor site.
Using Ansible for managing secrets
When the secrets are expected to be available in Ansible variables, we are using Ansible roles to read / write secrets:
You must define mount point, Vault path & name of a secret. Roles can generate password on its own, if it does not exist:
- hosts: all
  become: false
  vars:
    # full path will be secret/someproject/mysecret
    secret_store: "vault"
    vault_mount: "secret"
    vault_path: "someproject"
    vars_stored: # secret name and key for reading key/value pair
      - var: "mysecret"
        key: "secret"
  pre_tasks:
    - name: set variable content
      set_fact:
        mysecret: "DEADBEEF"
  roles:
    - ansible-save-secrets
- hosts: all
  become: false
  vars:
    secret_store: "vault"
    vault_mount: "secret"
    vault_path: "someproject"
    vars_stored:
      - var: "mysecret"
        key: "secret"
  roles:
    - ansible-load-secrets
Please note, that all secrets should be Base64 encoded.
For more information on how to use roles for reading/saving secrets, please check the appropriate role README files.
Accessing secrets via HTTP API
As with other methods, you need to know Vault address and have a valid token, then you can read/write/list secrets by calling secret store HTTP API:
# export environment variable
export VAULT_TOKEN=<your token>
# list secrets located in "somesafe"
curl \
    --header "X-Vault-Token: $VAULT_TOKEN" \
    --request LIST \
    https://vault.example.com/v1/secret/someproject
# write secret
curl \
    --header "X-Vault-Token: $VAULT_TOKEN" \
    --request POST \
    https://vault.example.com/v1/secret/someproject/mysecret \
    -d \
'{
  "dead":"beef"
}'
# read secret using http API
curl \
    --header "X-Vault-Token: $VAULT_TOKEN" \
    https://vault.example.com/v1/secret/someproject/mysecret
Integrating Vault deployment with Gitlab pipelines
It’s possible to leverage JSON Web Token (JWT) stored in the CI_JOB_JWT Gitlab environment variable to authenticate with Vault using the JWT Auth method. In the next three steps, we will setup Vault and use it for secret management directly from the Gitlab pipeline.
1. Enable JWT authentication backend in Vault
Enable Vault JWT authentication backend.
$ vault auth enable -path=gitlab_jwt jwt
Success! Enabled jwt auth method at: gitlab_jwt/
Write authentication backend configuration.
$ vault write auth/gitlab_jwt/config \
    jwks_url="https://gitlab.tools.in.pan-net.eu/-/jwks" \
    bound_issuer="gitlab.tools.in.pan-net.eu" \
    default_role="demo"
2. Setup vault role per each project
Write Vault policy that will be applied after successful authentication.
This step require knowledge of the Gitlab project ID. Alternative setup could be done for more general integration.
$ vault write auth/gitlab_jwt/role/demo - <<EOF
{
  "role_type": "jwt",
  "policies": ["testkv1"],
  "token_explicit_max_ttl": 60,
  "user_claim": "user_email",
  "bound_claims": {
    "project_id": "4953",
    "ref": "master",
    "ref_type": "branch"
  }
}
EOF
Example data that will be exposed in token:
"project_id": "22",
"project_path": "mygroup/myproject",
"user_login": "myuser",
3. Authenticate and use Vault while pipeline is running
---
image: docker-with-vault:v1.0.0

stages:
  - vault

variables:
  VAULT_ADDR: https://vault.example.com

read_secrets:
  stage: vault
  script:
    # authenticate
    - export VAULT_TOKEN="$(vault write -field=token auth/gitlab_jwt/login role=demo jwt=$CI_JOB_JWT)"
    # write password to vault
    - vault kv put testkv1/foo password=r4ndom
    # Now use the VAULT_TOKEN to read the secret and store it in an environment variable
    - export PASSWORD="$(vault kv get -field=password testkv1/foo)"
    - echo $PASSWORD
  only:
      - master
The only problem with this approach is that Vault operators are required to setup Vault roles per each project. It’s possible to solve similar use case with self-service solution, which we show in the next section.
For other possible integration steps, please refer to Authenticating and Reading Secrets With Hashicorp Vault guide.
Practical implementation used in Pan-Net
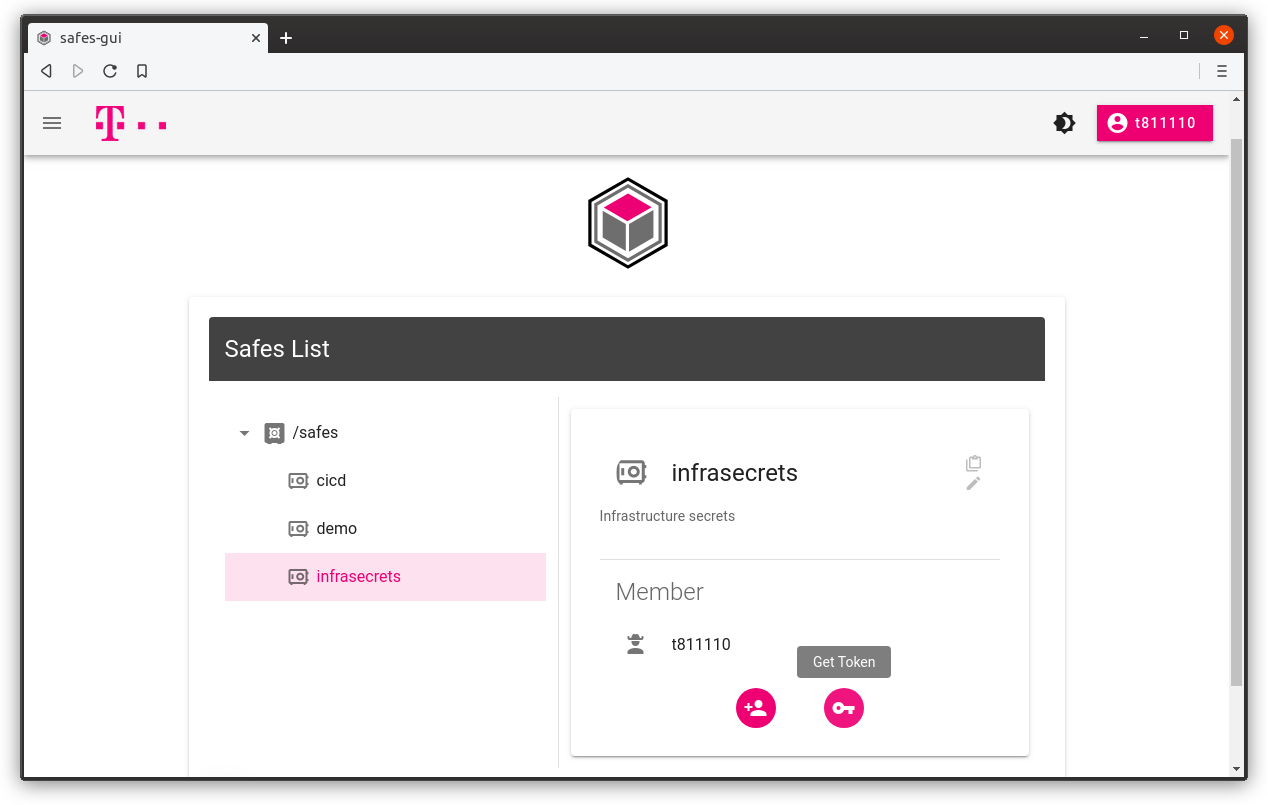
Deutsche Telekom Pan-Net uses Hashicorp Vault solution for storing secrets. However, Vault is missing business logic, where customer can obtain anad manage space in a secret store without contacting Vault operator personnel. To solve this problem, we have developen Pan-Net Safes self-service is an in-house developed solution enabling internal teams to manage access to a secrets using API and web interface, created and used by various infrastructure deployments across the organization.
Create new safe with Add Safe button
You can set Parent name, if you want it to be a child safe under an existing safe. Description field is optional.

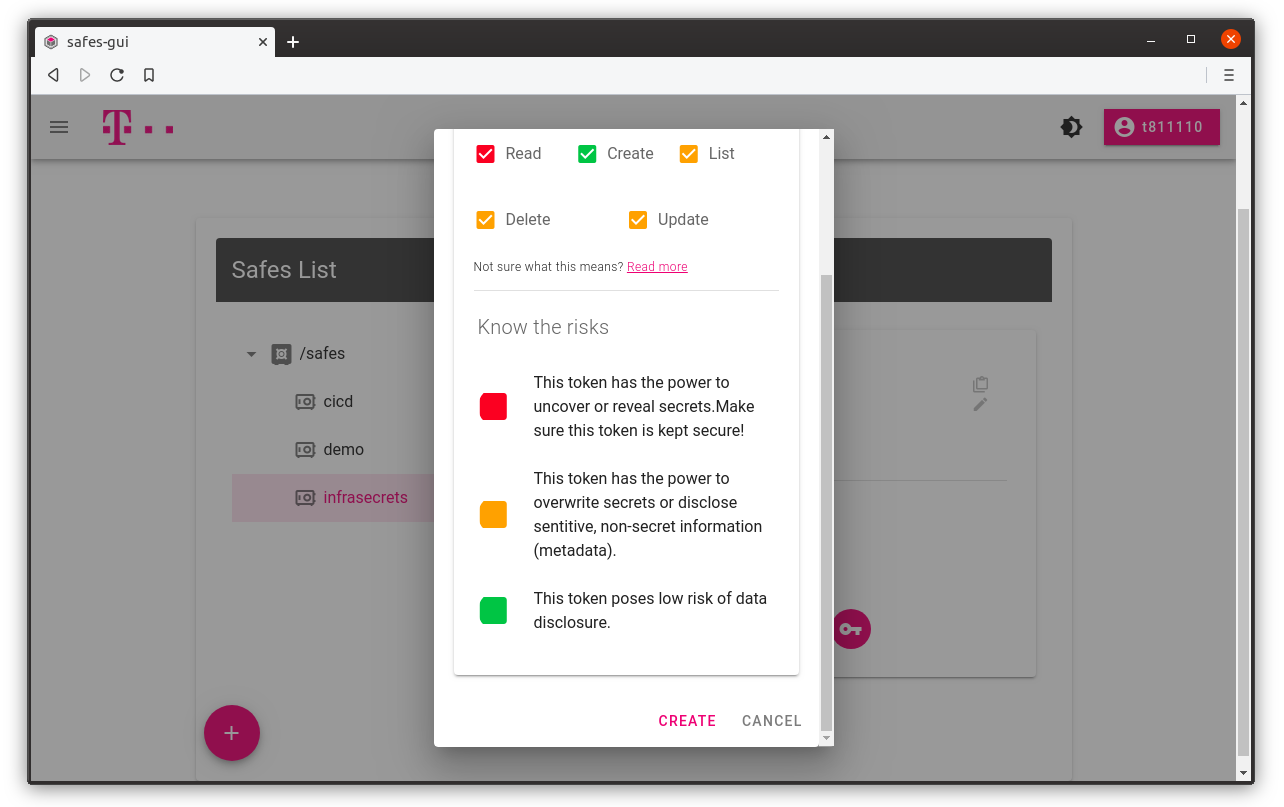
Get authentication token and full path to your secrets
You can get token for a safe by clicking Get Token button. Desired access is set to default, but you can create read-only token by unchecking update and create checkboxes.
You can also see absolute Vault path for which token is generated.
1. Select safe and click Get token button
2. Use default permissions or select a desired one
3. Copy secret token value and path to your secrets in the secret store cluster
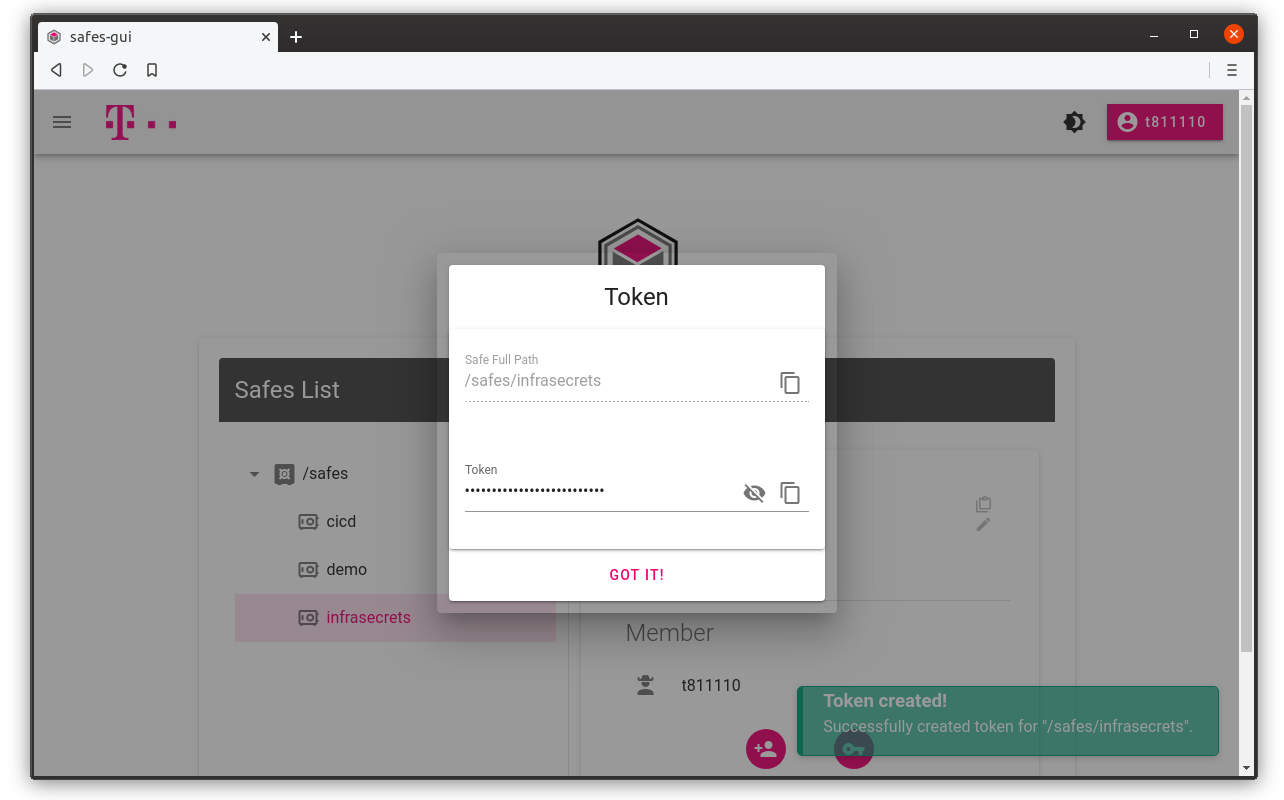
We can now use obtained token for managing our secrets.